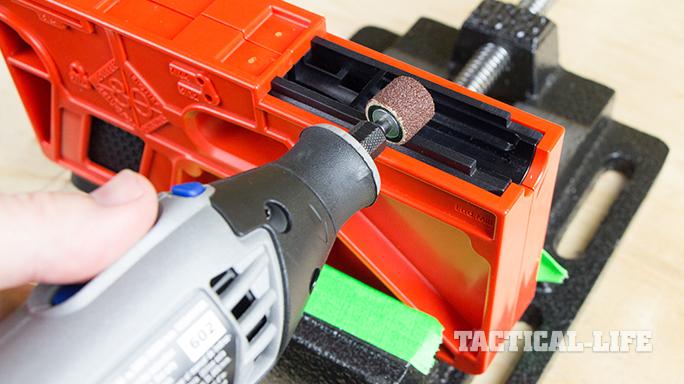
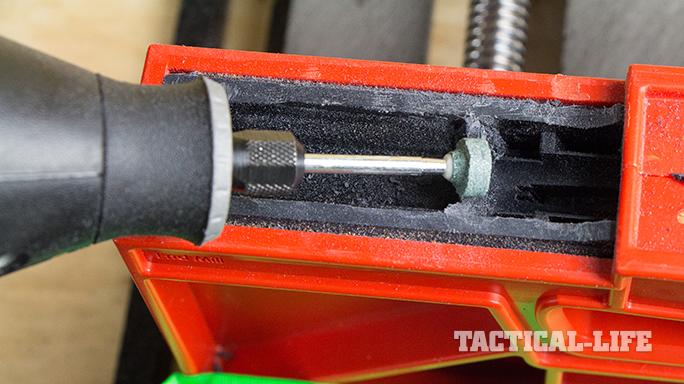
Step 1: Insert the frame into the jig, and secure it upright in your vise. Do not overtighten the vise, as you can crush the jig and frame. Using your Dremel tool with a sanding drum attachment, carefully remove the polymer exposed above the jig on the front of the pistol frame. I recommend taking away all the material until you’re just above the jig. Then use a finishing file and sandpaper to remove the last of the polymer material above the jig.
Step 2: Using the Dremel tool, carefully remove the centermost section of the cross member that runs between the two sides of the frame. Finish this with a rounded file and sandpaper for a cleaner look.
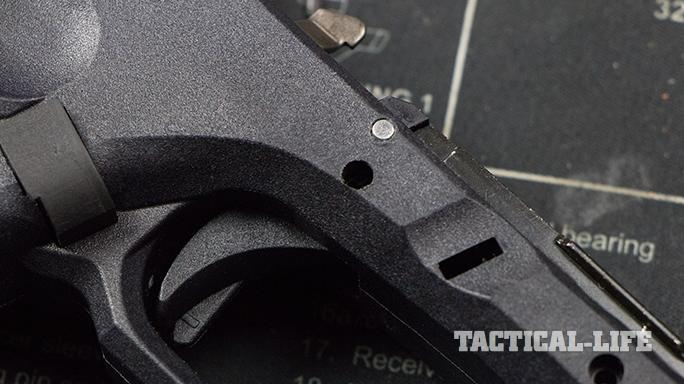
Step 3: With the jig still in the vise, drill out the three holes on the side of the frame. Do not use the drill press for this; use your hand drill. Each of the holes are marked on the jig with the size of the proper drill bit. These bits are included in the Polymer80 kit. Just match the bit to the jig hole, and drill a hole in the frame. Do not drill through the opposite side of the frame. When all of the holes on one side are drilled, flip the jig around and drill out the three holes on the other side of the frame. Again, be cautious not to drill into the opposite side of the frame, and do not use the drill press for this portion of the machining.
Step 4: Remove the jig and frame from the vise, and move it to the cross vise on your drill press. Install the small-end mill bit included with the Polymer80 frame into the drill press. Align the milling bit with one end of the rail-cutting section of the jig, and ensure that you can move the frame in the jig across the milling bit in a straight, level line. Now make sure you set the proper depth for the drill press. This is a critical step and perhaps the hardest of the machine work. Take your time and make sure everything is set up correctly before you begin milling. Double-check your depth and ensure your cross vise is secure before turning on the drill press. When you’re sure everything is set up correctly, turn on the press and begin milling. Start at one end of the cutout in the jig and move the cross vise slowly along, giving the press ample time to remove the polymer. A bit of compressed air can help keep debris out of your way so you can confirm the cut is being made in the correct place and at the correct depth. When you complete one side of the frame, flip the jig over and mill the slide rail on the opposite side of the frame.
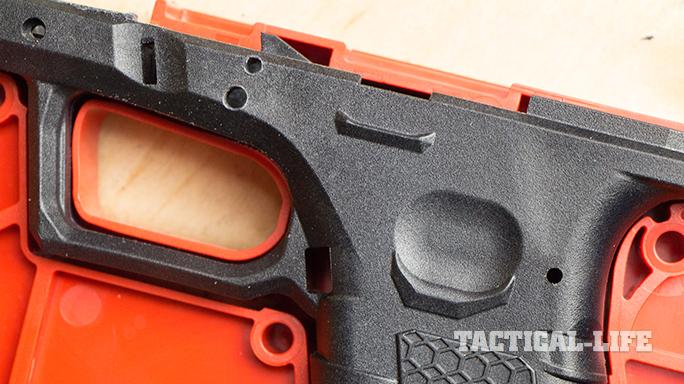
Step 5: Before installing the locking block and fitting the slide to the frame, I take a few minutes to clean up my work to that point. Using the finishing file, I smooth out the rear slide rails and ensure the top of the frame is smooth. I’m not doing the final finish on these areas. Rather, I’m just cleaning them so the fitting process goes a little easier. Use compressed air to clear small debris from the frame.
Step 6: You should now install the magazine catch in the PF940 frame. With needle-nose pliers, insert the magazine catch spring into its slot in the magazine well. Using the tip of the pliers, press down on the top of the spring to seat it. Slide in the magazine catch, and with a flat-head screwdriver, move the top of the spring into its slot on the catch.
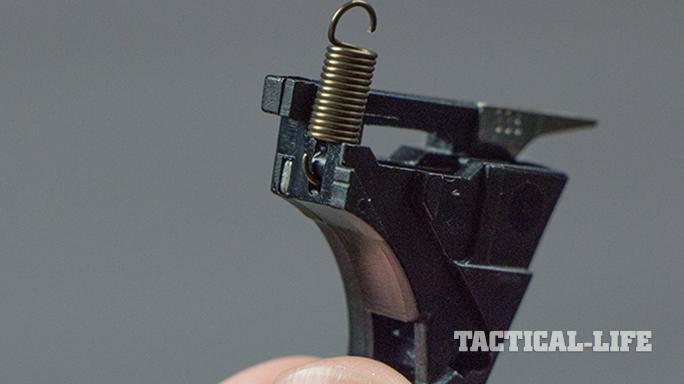
Step 7: Assemble your trigger assembly and fit it into the frame. When it’s in place, tap the trigger housing pin into place. I found the pin seats well below the surface of the frame, but this is true on a Glock frame, too. Polymer80 said the PF940 frame is thicker in this area than a Glock frame, and you can use a second locking block pin in this location if needed.
Step 8: Good news: You are almost done. However, don’t slack up yet, as installing the locking block can be tricky. To start, push the locking block into the frame. Assuming you didn’t overdo the Dremel work, this will be a tight fit. Take your time and line things up. It should press in fine. You might need to tap it lightly with a hammer, but ensure everything is properly lined up before applying force.
After the locking block is in place, install the locking-block pin in the smaller of the two holes above the trigger. Make sure the locking block is lined up correctly, and the pin should tap into place. It will be a tight fit, but it should go in.
Next, you need to install the trigger pin. The locking block, trigger and slide stop lever have to align with the frame. Keeping all of these parts in position while tapping a pin into place is a challenge. When installing the trigger pin, I found it easier to align all the parts with a punch and then tap the pin into place with the punch sliding out as I went.
When the trigger pin is properly installed, you complete the locking block installation with a pair of screws. To do so, carefully squeeze the front of the trigger block into the frame using your vise. Place the frame on its side in the vise and apply just enough pressure so the holes in the locking block align with those in the polymer frame. After they line up, install the screw, and then flip the frame over and repeat the procedure for the other side.
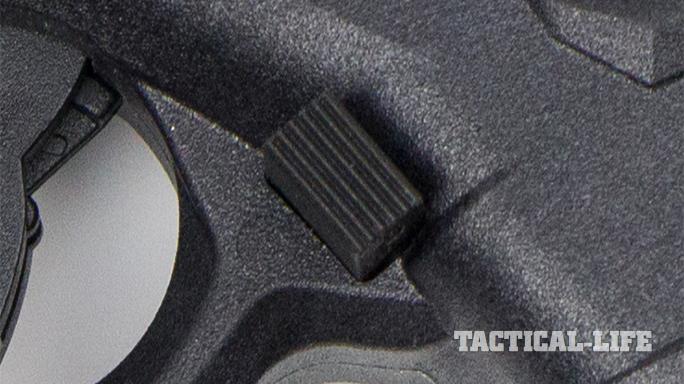
When the locking block is installed, you can install the slide-lock lever and spring.
Step 9: With the frame complete, it’s time to fit the slide to the frame. Take a complete slide assembly and slowly push it onto the frame. Look for problems with misalignment, excess friction and parts being out of place. If everything is close enough, the slide will go onto the frame.
The instructions provided by Polymer80 go into great detail to help with this step, including tips on how to diagnose special problems, such as contact between the locking block and slide, which might prevent smooth operation. Additionally, Polymer80 offers phone and online support to help you get the build correct.
Be prepared to spend lots of time on this step. A finishing file and sandpaper can help take down any high spots that might be dragging. I also like to finish with a very fine-grit sandpaper to make the machined areas look more professional.
Step 10: After the slide is fitted to the gun and you’ve done a function check, it’s time to get it on the range and break it in. Unlike a factory gun, you should expect some malfunctions early. You’re wearing some parts down so they will operate more reliably. When you start, I’d recommend adding a little gun grease to the slide rails and across the top of the locking block. After you start shooting, you should see a fairly rapid reduction in malfunctions, ultimately resulting in a reliable pistol. If you’re shooting but don’t see any improvements, take the gun down and check it closely for wear points and other clues that will suggest where the problem is. If you find part of the frame is dragging on the slide, take the high points down and try again. For other possible problems, contact Polymer80 for assistance. When the gun is running the way you like, consider the job done.
Building your own gun isn’t difficult. In fact, it’s dead simple. At one time, I believed there was something mystical about building your own firearm. It seemed only someone with an engineering degree and years of training on a CNC machine could accomplish such a feat. Then I took the plunge and built my own AR-15 from an 80-percent lower that I machined in my garage. The gun shot great, and I had broken through the mental barrier on what I could accomplish with some simple tools and a little effort. The next project that caught my eye was the Polymer80 PF940 incomplete pistol frame. Essentially a handgun equivalent to an 80-percent AR lower, the PF940 lets you build a full-sized pistol using Glock parts. It’s not exactly a Glock clone, as the shape, style and construction are significantly different. However, the slide, barrel, magazines and all other parts from Glock pistols work.
The Polymer80 PF940 frame is designed to work with third-generation 9mm, .40 S&W and .357 SIG Glock parts. For this build, I went with standard Glock 17 parts. However, I could have also gone with parts kits for the Glock 17 L, G22, G24, G31, G34 or G35. Completion parts are available in individual pieces from major gun supply shops such as Brownells and Midway USA. However, several specialty suppliers—such as Lone Wolf Distributors and GlockStore—offer everything from completion kits to race gun parts for the PF940.
Why would you build your own handgun? Various reasons, including the satisfaction of creating something to wanting to build something that isn’t available from any manufacturer. For example, Polymer80 offers frames in four colors—something that isn’t available on most pistols. Then you can add your own stippling, a custom slide and an enhanced trigger. Competitive shooters have been building their own 1911-style pistols for decades, and now you can compete with your own hand-built polymer gun.
Advertisement — Continue Reading Below
You can use various methods to complete the Polymer80 PF940 pistol frame. First, the PF940 comes with a jig and the appropriate drill and milling bits. The company offers detailed instructions that seemed to work pretty well. For this particular method, you will need a sturdy vise, a hand drill, a finishing file, 220-grit sandpaper, a drill press with a cross vise and blue or red Loctite.
For this article, I deviated from the company’s suggested method and used a completion technique published by GlockStore. This technique also requires a Dremel tool. Safety glasses are a must for any method. A sliver of polymer can ruin your vision just as quickly as a piece of aluminum.
In addition to the tools, you will need parts to turn the frame into a functioning firearm. I had a slide and barrel assembly on hand. If I had not, I could have purchased these parts already assembled from various sources, including some of the aforementioned businesses. I needed all of the parts that went into the frame, and I picked those up through the vendors I mentioned. I recommend using OEM Glock parts for your first build. The more you stray from the specific parts this frame was developed to use, the more you increase the possibility of problems.